Windows & Kubernetes - How does that fit together?
- sebastianmangelkra
- Sep 27, 2022
- 3 min read
Motivation and background
Kubernetes is the de facto standard for container orchestration. In the edge, in the core, and in the cloud. This much is clear. At FullStackS, we see Kubernetes as a kind of "operating system for the cloud." But what is the cloud made of?

Correct. A cloud consists of Linux servers. But what does that have to do with Windows & Kubernetes?
Containers have their origins in the Unix/Linux world - as does Kubernetes. The advantages of this technology - let's call it "Docker" - even though this is no longer true and Docker has long been "legacy" - do not only apply in Linux environments.
And even more important: Containers are not - and do not always have to be - microservices. Even "containerized" applications or even monoliths can benefit from the immense advantages of this technology (and especially of Kubernetes). And that is exactly the motivation.
Let's think about (existing) .NET applications - wouldn't it be great to be able to run them in a Kubernetes cluster, in the context of modernizing them? --> This is the use case.
With our partner SUSE / Rancher, we have the most powerful Kubernetes ecosystem on the market. The extremely stable (and certainly fully covered by the brilliant SUSE support until the end of 2022) Kubernetes distribution RKE1 offers support for Windows Worker Nodes. Yes, that's right: Windows Worker Nodes.
Come, let's build a Windows Kubernetes cluster
For a Windows Kubernetes cluster, we need the following ingredients:
SUSE Rancher (central Multi Kubernetes Cluster Management System)
RKE1 (Rancher Kubernetes Engine)
at least 2 Linux Worker Nodes
at least 1 Windows Worker Nodes
Here we do the setup "by hand" - for our customers we of course automate such rollouts with Infrastructure as Code using HashiCorp Terraform
Basic Layout
The following table shows a "minimal scenario" for a Windows Kubernetes cluster

In our example, Ubuntu 20.04 LTS and Windows Server 2019 (10.0.17763) with Docker CE 19.03x are used for the Linux nodes. The setup is of course 100% compliant with the current SUSE Support Matrix .
Creating the Windows Kubernetes cluster in Rancher
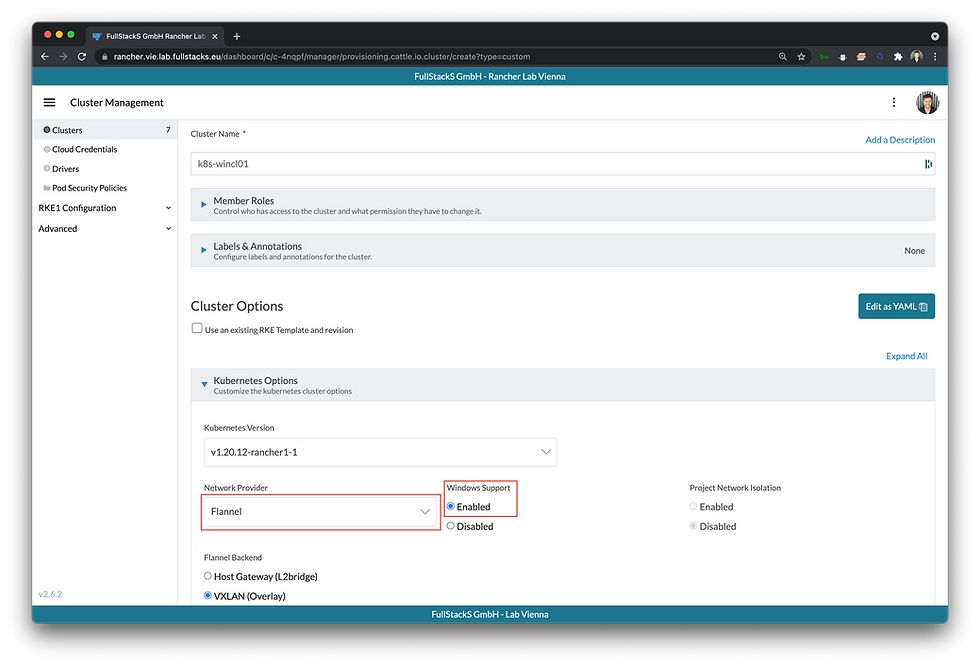
Click on ☰ > Cluster Management im Rancher UI
Click on “Create”
Click on “Custom”
Create a Name for the Cluster
Kubernetes Version >= 1.19
Select Network Provider “Flannel” and “Windows Support Enable”
Click on Next

Then Rancher presents the appropriate "Registration Command" for the respective node type (which, by the way, is also available via the API and via the Terraform Provider).
The procedure is as follows:
Add Linux Node(s) with Controlplane and etcd role
Add Linux node(s) with worker role
Add Windows node(s)
For Windows it looks like this:
PowerShell -NoLogo -NonInteractive -Command "& {docker run -v c:\:c:\host rancher/rancher-agent:v2.6.2 bootstrap --server https://rancher.vie.lab.fullstacks.eu --token <TOKEN> | iex}"Copy & paste the command into the Windows CMD:

After a few minutes, the Windows Kubernetes cluster is complete:

The following container instances run on the Windows node(s):

Function test
Now it is time to test the freshly created Windows Kubernetes cluster. At least the following things should be tested:
Kubernetes Cluster (Control Plane, API, etcd)
Deployment Windows Workload
CNI / Network Provider
Ingress (via Linux Worker Node)
For this purpose, we have created a simple deployment:
A simple "whoami" application written in .NET that outputs information over HTTP. The whole thing as a Kubernetes deployment with Service and Ingress.
As a base we use the cool container image from
Here is the deployment:
apiVersion: apps/v1
kind: Deployment
metadata:
  name: whoami-dotnet
spec:
  selector:
    matchLabels:
      app: whoami-dotnet
  template:
    metadata:
      labels:
        app: whoami-dotnet
    spec:
      containers:
      - name: whoami-dotnet
        image: sixeyed/whoami-dotnet:3.0
        resources:
          limits:
            memory: "128Mi"
            cpu: "500m"
          requests:
            memory: "64Mi"
            cpu: "250m"
        ports:
        - containerPort: 80
---

apiVersion: v1
kind: Service
metadata:
  name: whoami-dotnet
spec:
  selector:
    app: whoami-dotnet
  ports:
  - port: 80
    targetPort: 80
---

apiVersion: networking.k8s.io/v1
kind: Ingress
metadata:
  name: whoami-dotnet
  annotations:
  labels:
    name: whoami-dotnet
spec:
  rules:
  - host: 192.168.4.106.nip.io
    http:
      paths:
      - pathType: Prefix
        path: "/"
        backend:
          service:
            name: whoami-dotnet
            port:
              number: 80
After a "kubectl apply" we open the host of the ingress in the browser:

With this, we created our first (admittedly quite simple) Windows Kubernetes cluster.


Comments